Signup and Login using PHP

Pre-requisites: Basic Understanding HTML, CSS, PHP, MySQL, JavaScript and jQuery.
In this project:
- We will create a login and signup page with the help of HTML and CSS.
- Form validation will be performed using jQuery.
- Form submission to the server with the help of AJAX.
- On server end, processing the values with help of MySQLi.
- Displaying the result status on screen.
- Create mysite folder in your root directory and create index.php file in it.
<?php
    session_start();
    if(isset($_SESSION['user']) && $_SESSION['user'] != ''){
        header("Location:welcome.php");
    }
?>
<!DOCTYPE html>
<html>
    <head>
        <title>MY SITE</title>
        <link rel="stylesheet" type="text/css" href="css/style.css">
        <script src="js/jquery.js"></script>
        <script src="js/main.js"></script>
    </head>
    <body>
        <div class="main">
            <div class="outer__block" id="register__main" style="display:block">
                <div class="head">
                    <h3>REGISTER WITH US</h3>
                </div>
                <div class="form_body">
                <p class="error" id="signup__error"></p>
                    <form action="" method="POST" id="signup_form">
                        <input type="text" placeholder="Name" name="name" id="name"><br>
                        <input type="text" placeholder="Email" name="email" id="email"><br>
                        <input type="password" placeholder="Password" name="password" id="pass"><br>
                        <input type="password" placeholder="Re-enter Password" name="rpassword" id="rpass"><br>
                        <input type="radio" name="gender" value="male" checked="checked"><label>Male</label>
                        <input type="radio" name="gender" value="female"><label>Female</label><br>
                        <select name="country" id="country">
                            <option value="">Select Country</option>
                            <option value="India">India</option>
                            <option value="Australia">Australia</option>
                            <option value="USA">USA</option>
                        </select>
                        <button type="button" name="signup__button" id="signup__button">REGISTER</button>
                    </form>
                    <div class="footer">
                        <a href="javascript:void(0)" id="signIn">Or Sign In</a>
                    </div>
                </div>
            </div>
            <div class="outer__block" id="signin__main" style="display:none">
                <div class="head">
                    <h3>LOGIN</h3>
                </div>
                <div class="form_body">
                    <p class="error" id="login__error"></p>
                    <form action="" method="POST" id="login_form">
                        <input type="text" placeholder="Email" id="login_email" name="username"><br>
                        <input type="password" placeholder="Password" id="login_pass" name="password"><br>
                        <button type="button" id="login_button">LOGIN</button>
                    </form>
                    <div class="footer">
                        <a href="javascript:void(0)" id="register">Or Register</a>
                    </div>
                </div>
            </div>
        </div>
    </body>
</html>
Run mysite/index.php file in your browser to get the following output. URL may look like as follows:
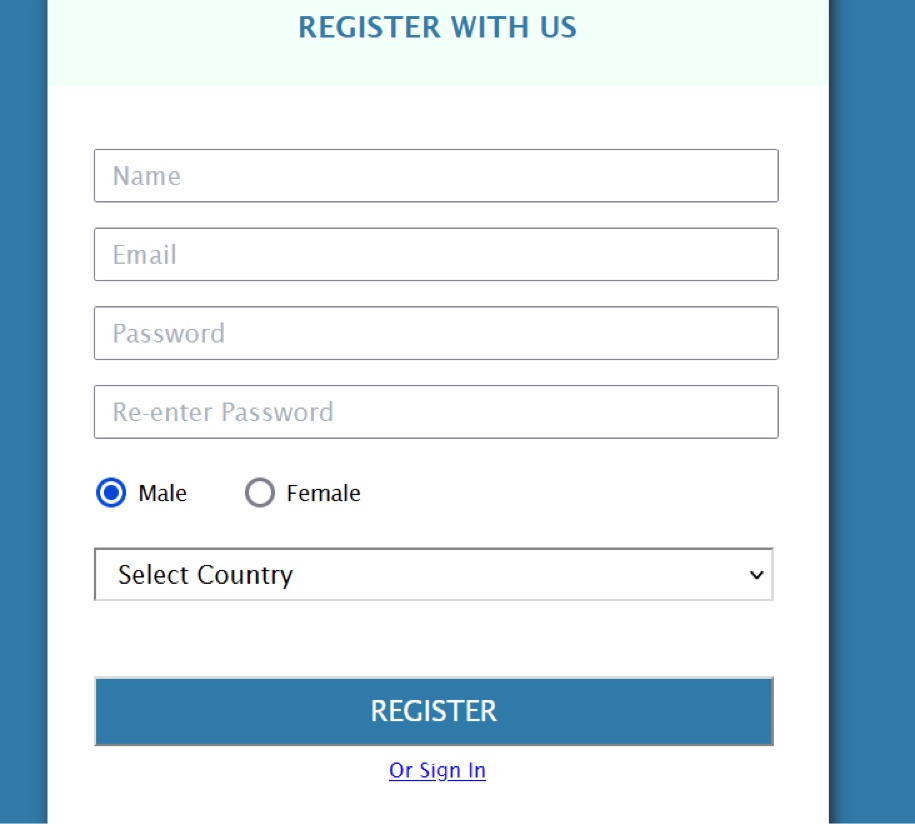
Signup Process⬇
Code Explanation of index.php |
DESCRIPTION
<input type="text" placeholder="Name" name="name" id="name"> Where,
|
SIGNUP PROCESS⬇
Code Explanation of main.js |
DESCRIPTION
If name field is empty, it will generate error and display the message in signup__error block. In a similar way, validations are performed for other fields as well. Conditions are added according to the requirement.
Ajax is used for form submission which means form will be submitted to the server without reloading the whole page content.
url: "registration_process.php", // URL DEFINES WHERE TO POST THE VALUES data: $("#signup_form").serialize(), // DATA CARRIES THE VALUES TO BE POSTED These parameters are necessary to mention while form submission.
Here, we have disabled the submit button once it is clicked. It is to avoid unnecessary clicking of submit button again and again, once it is submitted to the server for processing. Here, we have enabled the submit button again after receiving response from the server. If registration is successful user is moved to welcome.php otherwise error message is displayed on screen.
|
SIGNUP PROCESS⬇
Code Explanation of registration_process.php |
DESCRIPTION
Users table is checked, if the same email ID exists, it will return an error message otherwise, it will go for further processing.
(`id`, `username`, `password`, `name`, `gender`, `country`, `created_at`, `status`) VALUES (NULL, '".$email."', '".$password."', '".$name."', '".$gender."', '".$country."', '".date('Y-m-d H:i:s')."', '1')"; Values are inserted in users tables according to the syntax: INSERT INTO tablename (columns…) VALUES (values….)
|
SIGNUP PROCESS⬇
Code Explanation of welcome.php |
DESCRIPTIONWelcome.php will be loaded only if session will exist. Otherwise, user will be moved to index.php.
|
SIGNUP PROCESS⬇
Code Explanation of logout.php |
DESCRIPTION
|
SIGNIN PROCESS⬇
Code Explanation of index.php |
DESCRIPTION
<input type="text" placeholder="Email" name="username" id="login_email"> Where,
|
SIGNIN PROCESS
Code Explanation of main.js |
|
$("#login_button").click(function(){ var email = $("#login_email"); var pass = $("#login_pass"); if(email.val() == "" || validateEmail(email.val()) == 0){ email.focus(); $("#login__error").html("Please enter valid email"); }else if(pass.val() == ""){ pass.focus(); $("#login__error").html("Please enter password"); }else{ $("#login__error").html(""); $.ajax({ type: "POST", url: "process.php", data: $("#login_form").serialize(), beforeSend: function(){ $("#login_button").html("Please Wait...."); $("#login_button").prop('disabled', true); }, success: function(data){ $("#login_button").html("LOGIN"); $("#login_button").prop('disabled', false); $(this).val("LOGIN"); if(data == 1){ window.location.href = "welcome.php"; }else{ $("#login__error").html("Please enter valid login details"); } } }); } });
DESCRIPTION
if(email.val() == "" || validateEmail(email.val()) == 0){ email.focus(); $("#login__error").html("Please enter valid email"); } If email field is empty, it will generate error and display the message in login__error block. In a similar way, validations are performed for other fields as well. Conditions are added according to the requirement.
Ajax is used for form submission which means form will be submitted to the server without reloading the whole page content.
url: "process.php", // URL DEFINES WHERE TO POST THE VALUES data: $("#login_form").serialize(), // DATA CARRIES THE VALUES TO BE POSTED These parameters are necessary to mention while form submission.
$("#login_button").html("Please Wait...."); $("#login_button").prop('disabled', true); }, Here, we have disabled the submit button once it is clicked. It is to avoid unnecessary clicking of submit button again and again, once it is submitted to the server for processing.
$("#login_button").html("LOGIN"); $("#login_button").prop('disabled', false); $(this).val("LOGIN"); if(data == 1){ window.location.href = "welcome.php"; }else{ $("#login__error").html("Please enter valid login details"); } } Here, we have enabled the submit button again after receiving response from the server. If login is successful user is moved to welcome.php otherwise error message is displayed on screen.
|
Summary
In this project, we have learned to create login/ signup page.
HTML and CSS are used to create the layout of webpages.
Form validations are performed using jQuery in main.js file which is included in the head tag for index file.
Ajax is used to submit the forms without reloading the whole webpage.
MySQLi queries are used to connect to a database and save/retrieve data as per the requirement.
PREREQUISITES: Basic Understanding HTML, CSS, PHP, MySQL, JavaScript and jQuery.
In this project,
- We will create a login and signup page with the help of HTML and CSS.
- Form validation will be performed using jQuery.
- Form submission to the server with the help of AJAX.
- On server end, processing the values with help of MySQLi.
- Displaying the result status on screen.
Create mysite folder in your root directory and create index.php file in it.
Run mysite/index.php file in your browser to get the following output. URL may look like as follows:
http://localhost/mysite


|
SIGNUP PROCESS |
|
Code Explanation of index.php |
|
<link rel="stylesheet" type="text/css" href="css/style.css">
<script src="js/jquery.js"></script>
<script src="js/main.js"></script>
<form action="" method="POST" id="signup_form">

  <input type="text" placeholder="Name" name="name" id="name"><br>

  <input type="text" placeholder="Email" name="email" id="email"><br>

  <input type="password" placeholder="Password" name="password" id="pass"><br>

  <input type="password" placeholder="Re-enter Password" name="rpassword" id="rpass">

  <br>

 <input type="radio" name="gender" value="male" checked="checked"><label>Male</label>

  <input type="radio" name="gender" value="female"><label>Female</label><br>

  <select name="country" id="country">

     <option value="">Select Country</option>

     <option value="India">India</option>

     <option value="Australia">Australia</option>

     <option value="USA">USA</option>

  </select>

  <button type="button" name="signup__button" id="signup__button">REGISTER</button>

</form>
DESCRIPTION
<input type="text" placeholder="Name" name="name" id="name"> Where,
|
|
SIGNUP PROCESS |
|
Code Explanation of main.js |
|
$("#signup__button").click(function(){

        $("#signup__error").html("");

        var name= $("#name");

        var email = $("#email");

        var pass = $("#pass");

        var rpass = $("#rpass");

        var gender = $('input[name="gender"]:checked').val();

        var country = $("#country");

        if(name.val() == ""){

            name.focus();

            $("#signup__error").html("Please Enter Name");

        }else if(email.val() == "" || validateEmail(email.val()) == 0){

            email.focus();

            $("#signup__error").html("Please Enter Email ID");

        }else if(pass.val() == ""){

            pass.focus();

            $("#signup__error").html("Please enter password");

        }else if(rpass.val() == ""){

            rpass.focus();

            $("#signup__error").html("Reenter your password");

        }else if(rpass.val() !== pass.val()){

            rpass.focus();

            $("#signup__error").html("Passwords do not match");

            rpass.val("");

        }else if(country.val() == ""){

            country.focus();

            $("#signup__error").html("Please select your country");

        }else{

            $("#signup__error").html("");

            $.ajax({

                type: "POST",

                url: "registration_process.php",

                data: $("#signup_form").serialize(),

                beforeSend: function(){

                    $("#signup__button").html("Please Wait....");

                    $("#signup__button").prop('disabled', true);

                },

                success: function(data){

                    $("#signup__button").html("REGISTER");

                    $("#signup__button").prop('disabled', false);

                    $(this).val("LOGIN");

                    if(data == "success"){

                        $("#signup__error").html("");

                        window.location.href = "welcome.php";

                    }else{

                        $("#signup__error").html("Registration Failed! Try again later.");

                    }

                }

            });

        }

    });
DESCRIPTION
 if(name.val() == ""){

            name.focus();

            $("#signup__error").html("Please Enter Name");

   }
If name field is empty, it will generate error and display the message in signup__error block. In a similar way, validations are performed for other fields as well. Conditions are added according to the requirement.
Ajax is used for form submission which means form will be submitted to the server without reloading the whole page content.
url: "registration_process.php", // URL DEFINES WHERE TO POST THE VALUES data: $("#signup_form").serialize(), // DATA CARRIES THE VALUES TO BE POSTED These parameters are necessary to mention while form submission.
$("#signup__button").html("Please Wait...."); $("#signup__button").prop('disabled', true); }, Here, we have disabled the submit button once it is clicked. It is to avoid unnecessary clicking of submit button again and again, once it is submitted to the server for processing.
$("#signup__button").html("REGISTER"); $("#signup__button").prop('disabled', false); $(this).val("LOGIN"); if(data == "success"){ $("#signup__error").html(""); window.location.href = "welcome.php"; }else{ $("#signup__error").html("Registration Failed! Try again later."); } } Here, we have enabled the submit button again after receiving response from the server. If registration is successful user is moved to welcome.php otherwise error message is displayed on screen.
|
|
SIGNUP PROCESS |
|
Code Explanation of registration_process.php |
|
$sql = "SELECT id FROM users WHERE username = '".$email."' AND status = '1'";

$res = mysqli_query($con, $sql);

$count = mysqli_num_rows($res);

if($count > 0){

   $msg = "Email ID already registered.";

}else{

   $sql = "INSERT INTO `users`

(`id`, `username`, `password`, `name`, `gender`, `country`, `created_at`, `status`)

           VALUES

(NULL, '".$email."', '".$password."', '".$name."', '".$gender."', '".$country."', '".date('Y-m-d H:i:s')."', '1')";

   $res = mysqli_query($con, $sql);

   $id = mysqli_insert_id($con);

   if($id > 0){

       @session_start();

       $_SESSION['user'] = $email;

       $_SESSION['name'] = $name;

       $_SESSION['status'] = 1;

       $msg = "success";

    }else{

       $msg = "Some error occured. Please try later.";

    }

}
DESCRIPTION
Users table is checked, if the same email ID exists, it will return an error message otherwise, it will go for further processing.
(`id`, `username`, `password`, `name`, `gender`, `country`, `created_at`, `status`) VALUES (NULL, '".$email."', '".$password."', '".$name."', '".$gender."', '".$country."', '".date('Y-m-d H:i:s')."', '1')"; Values are inserted in users tables according to the syntax: INSERT INTO tablename (columns…) VALUES (values….)
|
|
SIGNUP PROCESS |
|
Code Explanation of welcome.php |
|
<?php

    session_start();

    if(!isset($_SESSION['user']) || $_SESSION['user'] == ''){

        header("Location:index.php");

    }

?>

<!DOCTYPE html>

<html>

    <head>

        <title>WELCOME <?=ucfirst($_SESSION['name'])?></title>

        <link rel="stylesheet" type="text/css" href="css/style.css">

    </head>

    <body>

        <div class="wrap">

            <header>

                <div class="left">

                    <h2>Hello <?=ucfirst($_SESSION['name'])?></h2>

                </div>

                <div class="right">

                    <a href="logout.php">Logout</a>

                </div>

            </header>

        </div>

    </body>

</html>
DESCRIPTION
if(!isset($_SESSION['user']) || $_SESSION['user'] == ''){ header("Location:index.php"); } Welcome.php will be loaded only if session will exist. Otherwise, user will be moved to index.php.
|
|
SIGNUP PROCESS |
|
Code Explanation of logout.php |
|
<?php

    session_start();

    session_destroy();

    header("Location:index.php");

?>
DESCRIPTION
|
|
SIGNIN PROCESS |
|
Code Explanation of index.php |
|
<link rel="stylesheet" type="text/css" href="css/style.css">
<script src="js/jquery.js"></script>
<script src="js/main.js"></script>
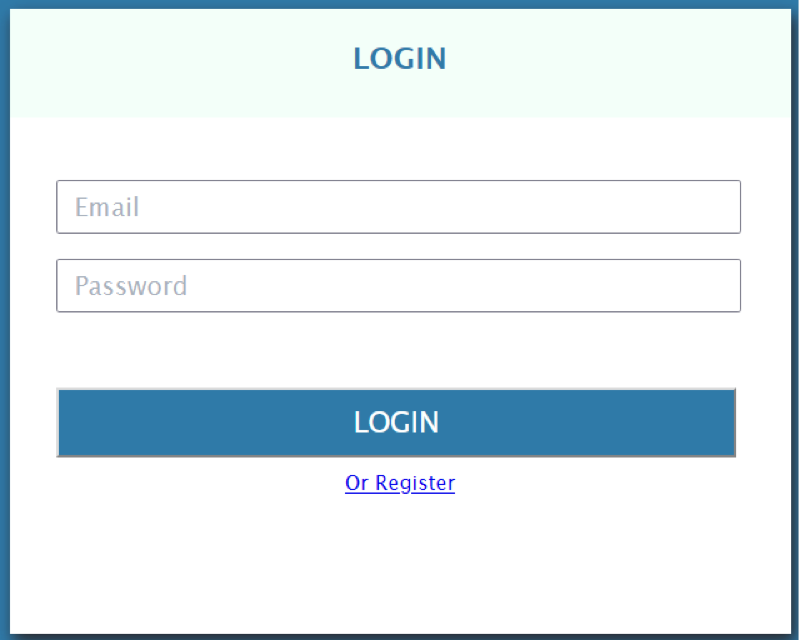
<form action="" method="POST" id="login_form">

      <input type="text" placeholder="Email" id="login_email" name="username"><br>

      <input type="password" placeholder="Password" id="login_pass" name="password"><br>

      <button type="button" id="login_button">LOGIN</button>

</form>
DESCRIPTION
<input type="text" placeholder="Email" name="username" id="login_email"> Where,
|
|
SIGNIN PROCESS |
|
Code Explanation of main.js |
|
$("#login_button").click(function(){ var email = $("#login_email"); var pass = $("#login_pass"); if(email.val() == "" || validateEmail(email.val()) == 0){ email.focus(); $("#login__error").html("Please enter valid email"); }else if(pass.val() == ""){ pass.focus(); $("#login__error").html("Please enter password"); }else{ $("#login__error").html(""); $.ajax({ type: "POST", url: "process.php", data: $("#login_form").serialize(), beforeSend: function(){ $("#login_button").html("Please Wait...."); $("#login_button").prop('disabled', true); }, success: function(data){ $("#login_button").html("LOGIN"); $("#login_button").prop('disabled', false); $(this).val("LOGIN"); if(data == 1){ window.location.href = "welcome.php"; }else{ $("#login__error").html("Please enter valid login details"); } } }); } });
DESCRIPTION
if(email.val() == "" || validateEmail(email.val()) == 0){ email.focus(); $("#login__error").html("Please enter valid email"); } If email field is empty, it will generate error and display the message in login__error block. In a similar way, validations are performed for other fields as well. Conditions are added according to the requirement.
Ajax is used for form submission which means form will be submitted to the server without reloading the whole page content.
url: "process.php", // URL DEFINES WHERE TO POST THE VALUES data: $("#login_form").serialize(), // DATA CARRIES THE VALUES TO BE POSTED These parameters are necessary to mention while form submission.
$("#login_button").html("Please Wait...."); $("#login_button").prop('disabled', true); }, Here, we have disabled the submit button once it is clicked. It is to avoid unnecessary clicking of submit button again and again, once it is submitted to the server for processing.
$("#login_button").html("LOGIN"); $("#login_button").prop('disabled', false); $(this).val("LOGIN"); if(data == 1){ window.location.href = "welcome.php"; }else{ $("#login__error").html("Please enter valid login details"); } } Here, we have enabled the submit button again after receiving response from the server. If login is successful user is moved to welcome.php otherwise error message is displayed on screen.
|
|
Summary |
In this project, we have learned to create login/ signup page.
- HTML and CSS are used to create the layout of webpages.
- Form validations are performed using jQuery in main.js file which is included in the head tag for index file.
- Ajax is used to submit the forms without reloading the whole webpage.
- MySQLi queries are used to connect to a database and save/retrieve data as per the requirement.
